Table of Contents
This is an old revision of the document!
Documentation utilisateur
Data retention
NB, part of the following instructions come from 1).
Snapshots
NB, this originates from 2).
First of all, which snapshots do we keep?
https://plone.unige.ch/distic/pub/nas-bureautique/nas-bureautique-accueil#spec-quota
- 4hourly : 1 snapshot chaque 4 heures, avec une queue de 42. Nous conservons donc un historique d'une semaine.
- weekly : 1 snapshot par semaine (le dimanche) avec une queue de 6. Nous conservons donc un historique d'un mois et demi (6 semaines).
Then, how to access them?
- Windows: in the
File Explorer:
⇒ right-click on the folder (either at the share root or at any sub-folder), thenProperties → Previous Versions - Mac or Linux:
⇒ enter the.snapshothidden folder
Backups
NB, this originates from 3).
For anti-ransomware reasons, we also have a backup on tape of each NAS share, thus completely independent from the NAS infrastructure.
Some notes:
- while our goal is to have 3day backups, we assure only at least a weekly backup.
- data that has been deleted from the NAS share is kept up to 2 years after the deletion date.
Then, how to access them?
Data transfer
rsync
NB, the following instructions come from 4)
If you need to synchronize data to another folder, you can let `rsync` 3.1.0+ saves in the log file the MD5 checksum of any transferred file (cf. https://stackoverflow.com/questions/29624524/how-can-i-print-log-the-checksum-calculated-by-rsync#45053057):
$ rsync \
      --log-file=/path/to/file.log \
      --log-file-format="%C  %f" \
      [...] \
      "${SOURCE_FOLDER}" \
      "${TARGET_FOLDER}"
$ grep -e "${SOURCE_FOLDER}" /path/to/file.log | \
      cut -c 29- | \
      awk '{if ($2 != "") {print $0}}' | \
      sed -e "s, ${SOURCE_FOLDER}/, ,g" \
      >"/path/to/${SOURCE_FOLDER}.md5"
$ cd "${TARGET_FOLDER}"
$ md5sum -c "/path/to/${SOURCE_FOLDER}.md5"
Statistiques utilisation
TreeSize est lancé sur certains share de manière périodique.
Utilisation d'un partage SMB
NB, this partly originate from 5).
Lorsqu'un partage a été crée et que votre CI vous a donné les droits d'accès, suivez la procédure ci-dessous pour vous connecter à votre partage. A noter que pour vous connecter à un partage depuis l'extérieur de l'université, vous devez configurer et lancer votre VPN. Veuillez vous référer à la documentation du VPN de l'unige pour ce faire.
ug-nas-test-smb-browsing.sh script!
Problèmes connus avec produits Adobe
NB, this originates from 6) 7)
Les produits Adobe sont de plus en plus “strictes” par rapport aux disques réseaux :
- Photoshop ne support pas le disques réseaux :
https://support-si.unige.ch/openentry.html?tid=INC000000281029
https://helpx.adobe.com/photoshop/kb/networks-removable-media-photoshop.html - Acrobat “Protected Mode” ne permet pas de sauvegarder des PDFs sur des disques réseaux :
https://community.adobe.com/t5/acrobat-reader-discussions/save-as-in-network-drive-not-possible/td-p/9000860?profile.language=fr
https://community.adobe.com/t5/acrobat-discussions/error-while-saving-a-pdf-file-to-a-mapped-drive/td-p/5270686
Allocated space for an SMB share
First of all, you need to mount the share root (thus, not a super/sub-folder).
Then
- Windows: in the
File Explorer:
⇒ right-click on the folder (either at the share root or at any sub-folder), thenGeneral → Capacity - Mac or Linux:
⇒ in a terminaldf -h /path/to/the/mounted/share
List all the shares you have access
NB, part of the following instructions come from 8).
Here the commands to get the list of all the shares you have access on a specific server:
- Windows 9):
PS C:\WINDOWS\system32> net view \\nasac-faculty.unige.ch /all |
 Select-String Disk
[...]
PS C:\WINDOWS\system32> (net view \\nasac-faculty.unige.ch /all |
 Select-String Disk).length
107
PS C:\WINDOWS\system32>
- GNU/Linux:
ATTENTION, unfortunately'smbclient -L' does not allow “grep-piping” if interactive!capello@harlock:~$ smbclient -L nasac-faculty.unige.ch -W ISIS -U capello Enter ISIS\capello's password: Sharename Type Comment --------- ---- ------- [...] SMB1 disabled -- no workgroup available capello@harlock:~$ cat <<EOF >~/.smbclient username = capello password = ${ISIS} domain = ISIs EOF capello@harlock:~$ smbclient -L nasac-faculty.unige.ch -W ISIS -A ~/.smbclient | grep -c Disk 107 capello@harlock:~$
Connection depuis linux
La procédure est sensiblement la même pour d'autres variantes de Linux.
Command line
- via plain old
mountcommand, which however requires superuser privileges:root@harlock:~# findmnt /mnt root@harlock:~# mount \ -t cifs \ -o vers=3,sec=ntlmsspi,domainauto,username=capello \ //nasac-faculty.isis.unige.ch/ADM_HOME/DISTIC/capello \ /mnt/ Password for capello@//nasac-faculty.isis.unige.ch/ADM_HOME/DISTIC/capello: root@harlock:~# findmnt /mnt TARGET SOURCE FSTYPE OPTIONS /mnt //nasac-faculty.isis.unige.ch/ADM_HOME/DISTIC/capello cifs rw,relatime,vers=3,sec=ntlmsspi,cache=strict,username=capello,domain=ISIS,uid=0,noforceuid,gid=0,noforcegi root@harlock:~# - via GVfs/Gio (i.e. the same “helper” framework used by most of the graphical tools including the default Ubuntu desktop), which is an unprivileged action:
capello@harlock:~$ gio mount smb://nasac-faculty.isis.unige.ch/ADM_HOME/DISTIC/capello
Password required for share adm_home on nasac-faculty.isis.unige.ch
User [capello]:
Domain [WORKGROUP]: ISIs
Password:
capello@harlock:~$ ls -l /run/user/$(id -u)/gvfs/
total 2
drwx------ 1 capello capello 2048 Nov 30 11:50 smb-share:server=nasac-faculty.isis.unige.ch,share=adm_home
capello@harlock:~$
Graphical interface
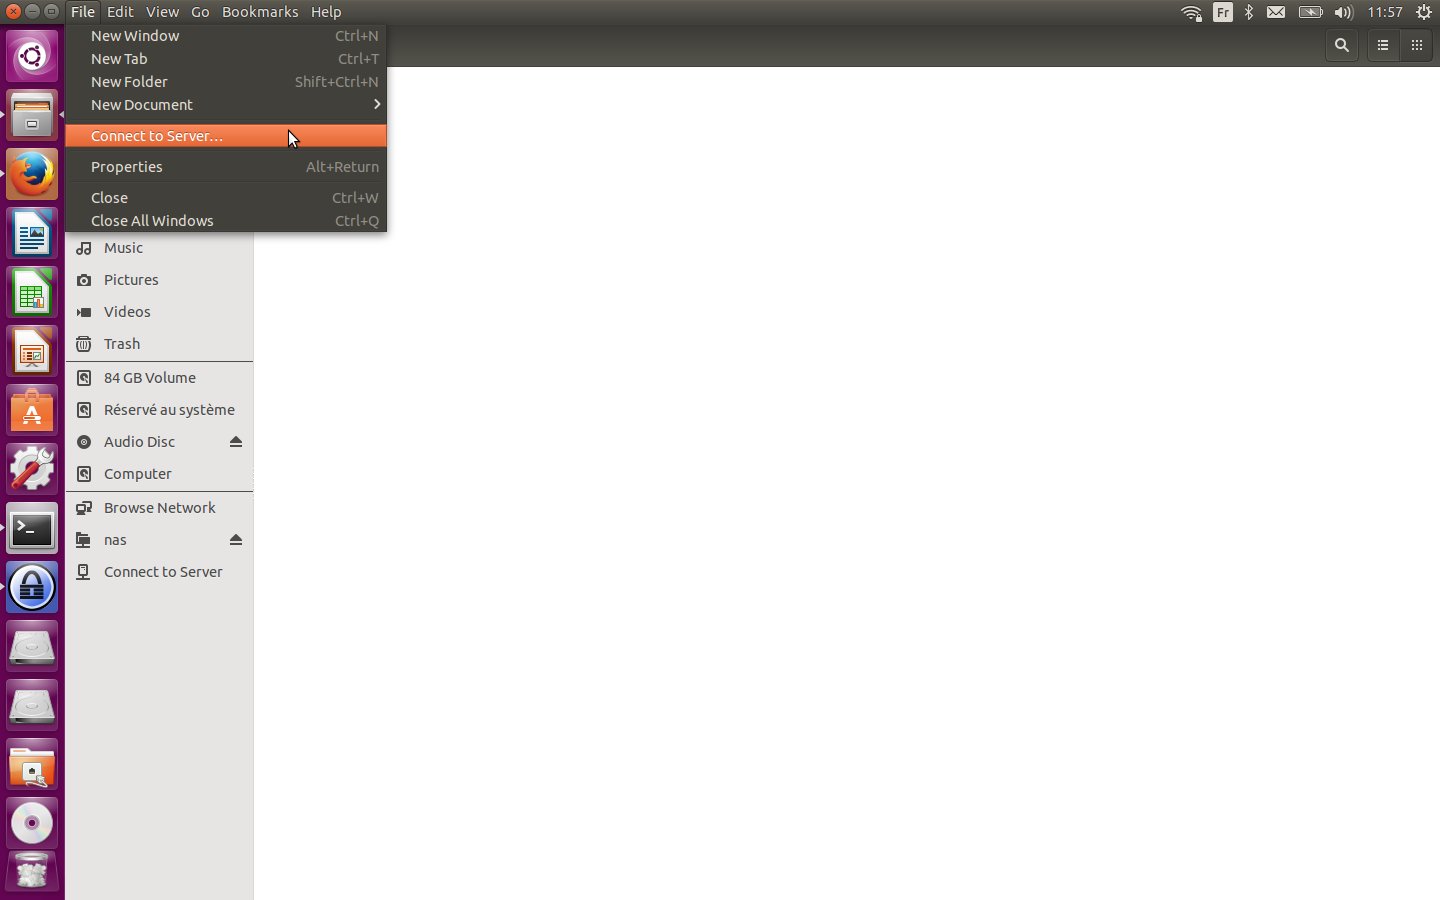
Se connecter à un serveur:
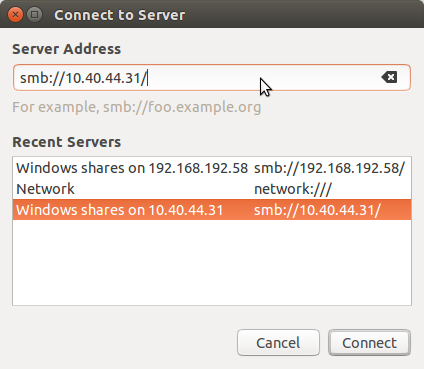
Choisir l'ip ou le nom de votre EVS (transmis par votre CI):
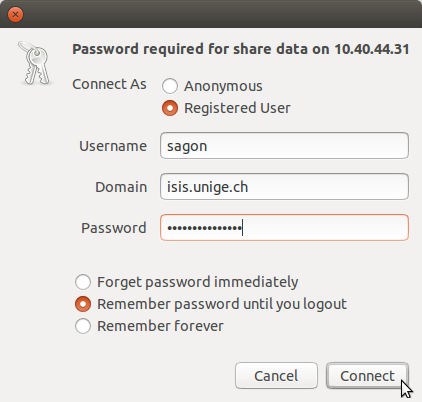
Entrer vos identifiants ISIS:
Linux and SMB3+
NB , the following instructions come from <https://gitlab.unige.ch/prods/ies/recherche/hpc/issues/925>
SMB3+ requires packet signing, thus if you encounter the following error…
CIFS VFS: validate protocol negotiate failed: -13
CIFS VFS: failed to connect to IPC (rc=-5)
CIFS VFS: validate protocol negotiate failed: -13
CIFS VFS: session ffff962f7cd42400 has no tcon available for a dfs referral request
CIFS VFS: cifs_mount failed w/return code = -5
…you have to specify that you want packet signing via a mount option, either sec=ntlmsspi (preferred) or sec=ntlmv2.
Linux and symlinks on SMB shares
NB , the following instructions come from <https://gitlab.unige.ch/prods/ies/recherche/hpc/issues/873>
Starting from Windows 10, symlinks (AKA symbolic links) are fully supported (cf. https://blogs.windows.com/windowsdeveloper/2016/12/02/symlinks-windows-10/ ). However, while Linux can make use of symlinks on a SMB share created on Windows 10, there is no way to create them on Linux.
On the other hand, Linux-only symlinks on SMB shares are still possible, no more via the SMB1-only CIFS Unix Extensions (cf. https://www.samba.org/samba/CIFS_POSIX_extensions.html ), but via the new SMB3 POSIX Extensions (cf. https://wiki.samba.org/index.php/SMB3-Linux#Symbolic_links ).
Specyfing the mount option mfsymlinks will allow symlink creation on Linux using the Minshall+French file format, which means that they will be seen on Windows as a plain text file (cf. https://wiki.samba.org/index.php/UNIX_Extensions#Storing_symlinks_on_Windows_servers ).
ATTENTION , while the mount option mfsymlinks is available from SMB2+, it is preferable to use it together with SMB3+ (see Linux and SMB3+).
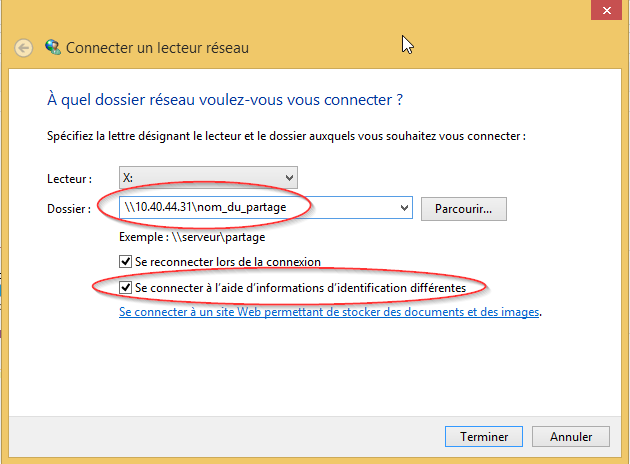
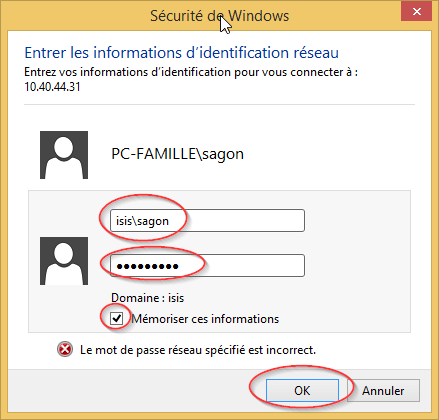
Connection depuis un poste windows ne faisant pas partie du domaine
Connectez un lecteur réseau pour y accéder à partir de l’Explorateur de fichiers dans Windows sans avoir à le rechercher ou à saisir son adresse réseau à chaque fois.
- Ouvrez l'Explorateur de fichiers à partir de la barre des tâches ou du menu Démarrer, ou appuyez sur la Touche de logo Windows + e.
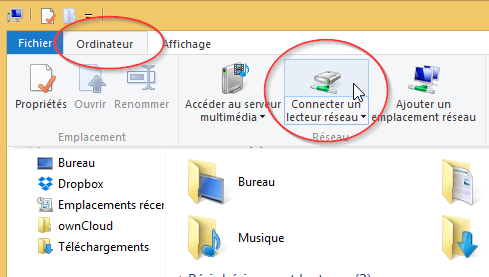
- Sélectionnez Ce PC dans le volet de gauche. Puis, dans l'onglet Ordinateur, sélectionnez Connecter un lecteur réseau
Sélection du disque et du nom du partage:
Saisie de vos identifiants ISIS:
Connection refused after successful login
NB, this originates from 10) 11) 12)
If you still get connection refused messages and you are sure your ISIs credentials are right, the IP address your computer got could have been blacklisted in the last 15 minutes on the NAS side because of too many SMB NTLM authentication failures.
Here how to find out if you are impacted:
- find out your current IP address:
- Windows:
Start → PowerShell → ipconfig → IPv4 Address - Mac:
Applications → Terminal → ifconfig | grep -e “inet ” - Linux:
Applications → Terminal → ip addr show | grep -e “inet ”
- check if your IP is listed in the last-unblocked-IP on https://luninasadm1.unige.ch/nas-smb-barred-clients-list.txt
How to manage SMB ACLs (AKA permissions)
NB, part of the following instructions come from 13).
You must set the access rights directly from Windows, please check the “Affectation des droits” paragraph in the “Gestion des postes de travail avec l'Active Directory (AD)” guide available on Plone.
smbcacls (usually shipped by the smbclient package)!
rsync
If you are encountering network errors when copying a gvfs mount, you should use a tool dedicated to network copy such as rsync, gio copy or scp.
When copying CIFS data from and to linux using Rsync, you can use this rsync example
rsync --partial --stats --progress –A –a –r –v --no-perms src dest
How to manage an NFS share
NB , the following instructions come from <https://gitlab.unige.ch/prods/ies/recherche/hpc/issues/716>
Nowadays most of the GNU/Linux distribution defaults to NFSv4, which is a big step forward and differs quite a lot from NFSv3 (cf. http://www.citi.umich.edu/projects/nfsv4/ ). One of the main advantages of NFSv4 is the ACLs support into the protocol itself (cf. http://wiki.linux-nfs.org/wiki/index.php/ACLs ), ACLs that resemble very much the Windows ones.
The NASAC, being based on a Unix system, natively supports NFSv4 ACLs. Actually, given that it is connected to the UniGE's Active Directory, the NFSv4 ACLs are the same as the Windows ones.
Here the instructions to manage the NFSv4 ACLs for a share:
- client mapping does not matter, knowing that when no local mapping is possible everything is nobody:nobody (cf. https://www.thegeekdiary.com/nfsv4-mountpoint-shows-incorrect-ownerships-as-nobodynobody-in-centos-rhel/ ).
ATTENTION :- on RHEL 6.3+ NFS ID mapping is disabled by default, _i.e._ /sys/module/nfs/parameters/nfs4_disable_idmapping is set to Y (cf. https://access.redhat.com/articles/2252881 ), thus numeric UIDs/GIDs are sent over the wire.
- NFSv4 ID mapping on clients is now managed by a separate process, nfsidmap (which does not run as a daemon), thus you no more need rpm.idmapd . Nevertheless, they share the same configuration file, _i.e._ /etc/idmapd.conf .
- server mapping is mandatory, thus ask the NASAC administrator to map the needed users/groups via support-si .
- please DO NOT USE chmod to set any POSIX permissions, given that this actually interacts with the NFS4 ACLs, setting the latter to reflect the POSIX permissions just set (cf. http://wiki.linux-nfs.org/wiki/index.php/ACLs#Server and http://wiki.linux-nfs.org/wiki/index.php/ACLs#Strict_Mapping ).
- it is thus not possible to combine both, POSIX permissions and NFS4 ACLs, but you can combine POSIX ownership and NFSv4 ACLs.
- the NFSv4 ACLs order matters and try to avoid DENY ACLs, they are evaluated before ALLOW ones (cf. https://docs.microsoft.com/en-us/windows/win32/secauthz/dacls-and-aces and https://docs.microsoft.com/en-us/windows/win32/secauthz/order-of-aces-in-a-dacl ).
- special care must be taken if the NFSv4 share is also available via CIFS, given that the NFSv4 ACLs are also the Windows ones and thus errors done on the CIFS share have an impact on the NFSv4 share as well.
- posixuser:root is now able to access the NFSv4 share in read/write mode without any server modification (_i.e._ the NFSv3 rootsquash option is no more available).
- the nfs4-acl-tools package (both .deb and .rpm) provides the nfs4_[edit|get|set]facl programs to manage the NFSv4 ACLs (cf. their manpages, man 5 nfs4_acl or https://www.osc.edu/book/export/html/4523 for an overview).
